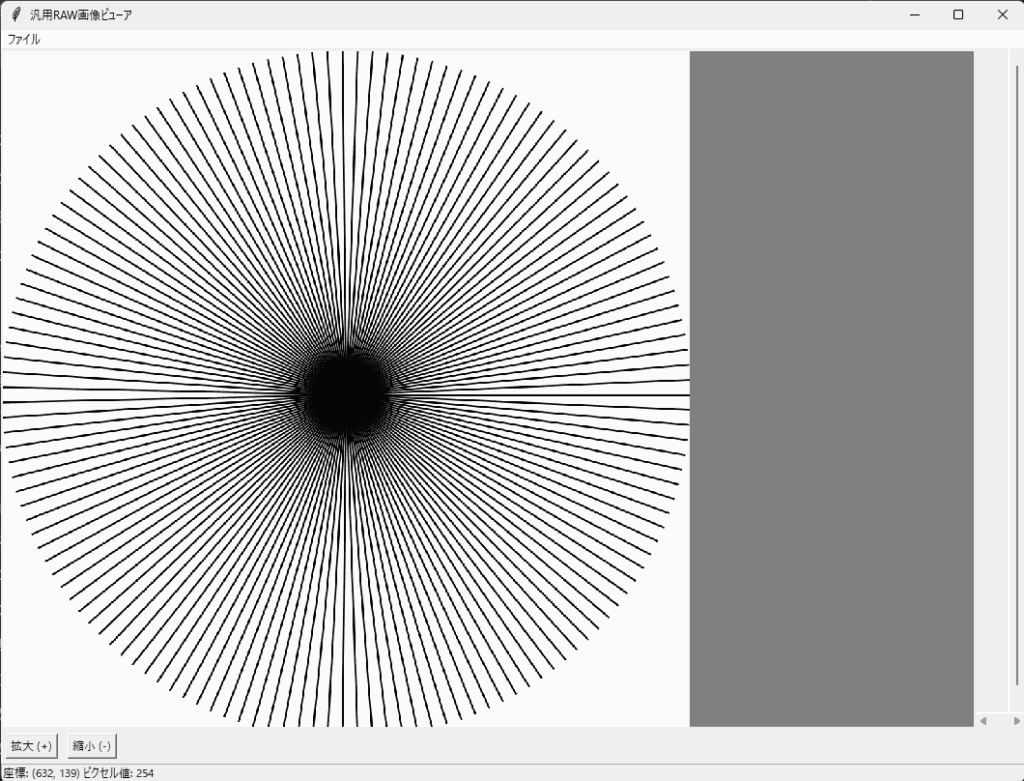
今回は、汎用的なRAW画像を閲覧・評価するためのPythonアプリケーションの作成方法をご紹介します。このアプリは、ヘッダー情報を持たない純粋なバイナリデータの.rawファイルを扱うことができ、画像の表示、拡大縮小、パン、ピクセル値の確認、範囲選択による画像解析など、多彩な機能を備えています。
特徴
- 複数のRAW画像の読み込みと平均化表示: 複数のRAW画像ファイルを一度に読み込み、平均化した画像を表示します。
- 画像の拡大縮小・パン: マウス操作で画像の拡大縮小や移動が可能です。
- ピクセル値の確認: マウスカーソルを画像上に移動すると、その位置の座標とピクセル値が表示されます。
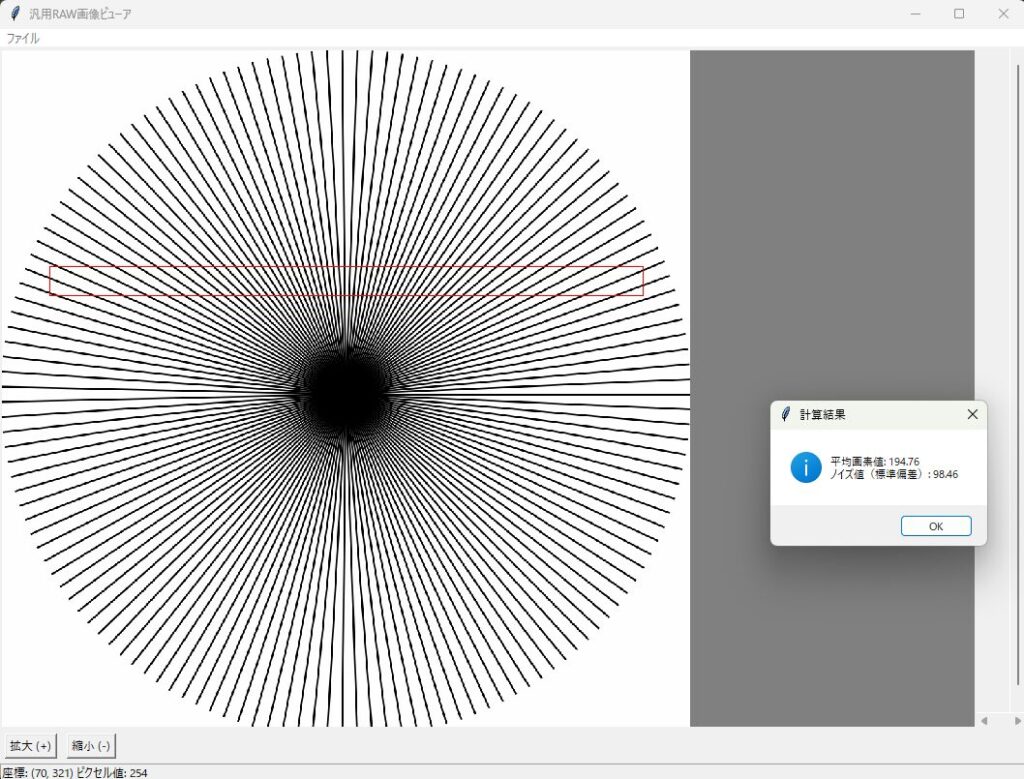
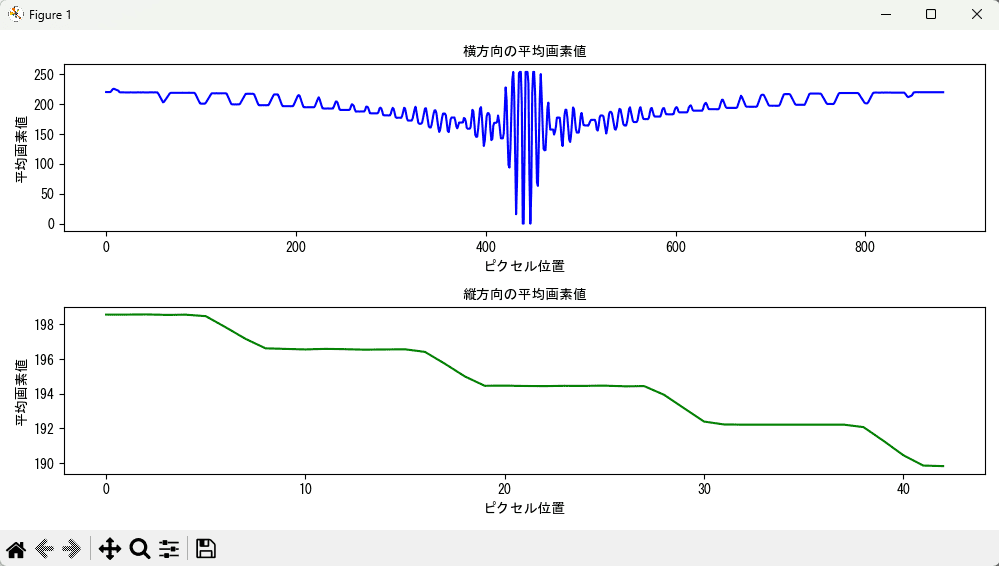
- 範囲選択と解析: 画像上で範囲選択を行い、その領域の平均画素値やノイズ(標準偏差)を計算します。また、縦方向・横方向の平均画素値のプロファイルをグラフ表示します。
- ドラッグ&ドロップ対応: 画像ファイルをキャンバス上にドラッグ&ドロップして読み込むことができます。
必要なライブラリのインストール
このアプリを動作させるためには、以下のPythonライブラリが必要です。コマンドラインで以下を実行してインストールしてください。
pip install numpy pillow matplotlib tkinterdnd2
- numpy: 数値計算用ライブラリ
- Pillow (PIL): 画像処理用ライブラリ
- matplotlib: グラフ描画用ライブラリ
- tkinterdnd2: Tkinterでドラッグ&ドロップ機能を実装するためのライブラリ
コードの説明
以下は、アプリの完全なコードです。
# raw_image_viewer.py

import tkinter as tk
from tkinter import filedialog, messagebox
import numpy as np
from PIL import Image, ImageTk
import os
import json
import matplotlib.pyplot as plt
from tkinterdnd2 import DND_FILES, TkinterDnD

class RawImageViewer(TkinterDnD.Tk):
    def __init__(self):
        super().__init__()
        self.title('汎用RAW画像ビューア')
        self.geometry('1200x900')
        self.image = None
        self.photo_image = None
        self.zoom_level = 1.0
        self.offset_x = 0
        self.offset_y = 0
        self.last_params = self.load_last_params()
        self.rect = None  # 選択範囲の矩形
        self.create_widgets()
        self.pixel_window = None  # 周辺画素値を表示するウィンドウ
        self.bind('<Control-o>', lambda event: self.open_raw_image())  # Ctrl+Oで開く

    def create_widgets(self):
        # メニューバーの作成
        menubar = tk.Menu(self)
        filemenu = tk.Menu(menubar, tearoff=0)
        filemenu.add_command(label="開く (Ctrl+O)", command=self.open_raw_image)
        filemenu.add_separator()
        filemenu.add_command(label="終了", command=self.quit)
        menubar.add_cascade(label="ファイル", menu=filemenu)
        self.config(menu=menubar)

        # フレームの作成
        self.frame = tk.Frame(self)
        self.frame.pack(fill=tk.BOTH, expand=True)

        # キャンバスの作成
        self.canvas = tk.Canvas(self.frame, bg='gray', cursor="cross")
        self.canvas.pack(side=tk.LEFT, fill=tk.BOTH, expand=True)

        # スクロールバーの作成
        self.hbar = tk.Scrollbar(self.frame, orient=tk.HORIZONTAL, command=self.canvas.xview)
        self.hbar.pack(side=tk.BOTTOM, fill=tk.X)
        self.vbar = tk.Scrollbar(self.frame, orient=tk.VERTICAL, command=self.canvas.yview)
        self.vbar.pack(side=tk.RIGHT, fill=tk.Y)
        self.canvas.config(xscrollcommand=self.hbar.set, yscrollcommand=self.vbar.set)

        # イベントのバインド
        self.canvas.bind('<MouseWheel>', self.zoom)  # Windows
        self.canvas.bind('<Button-4>', self.zoom)    # Linux (scroll up)
        self.canvas.bind('<Button-5>', self.zoom)    # Linux (scroll down)
        self.canvas.bind('<ButtonPress-1>', self.start_pan)
        self.canvas.bind('<B1-Motion>', self.do_pan)
        self.canvas.bind('<ButtonRelease-1>', self.end_pan)
        self.canvas.bind('<Motion>', self.show_pixel_value)
        self.canvas.bind('<ButtonPress-3>', self.start_rect)
        self.canvas.bind('<B3-Motion>', self.draw_rect)
        self.canvas.bind('<ButtonRelease-3>', self.end_rect)

        # ドラッグ&ドロップの設定
        self.canvas.drop_target_register(DND_FILES)
        self.canvas.dnd_bind('<<Drop>>', self.drop)

        # ステータスバーの作成
        self.statusbar = tk.Label(self, text="画像を開いてください", bd=1, relief=tk.SUNKEN, anchor=tk.W)
        self.statusbar.pack(side=tk.BOTTOM, fill=tk.X)

        # ズームボタンの作成
        zoom_in_button = tk.Button(self, text="拡大 (+)", command=self.zoom_in)
        zoom_in_button.pack(side=tk.LEFT, padx=5, pady=5)
        zoom_out_button = tk.Button(self, text="縮小 (-)", command=self.zoom_out)
        zoom_out_button.pack(side=tk.LEFT, padx=5, pady=5)

    def open_raw_image(self):
        file_paths = filedialog.askopenfilenames(filetypes=[("RAW files", "*.raw"), ("All files", "*.*")])
        if file_paths:
            self.load_images(file_paths)

    def drop(self, event):
        # デバッグ用にイベントデータを出力
        print("Drop event data:", event.data)
        # ファイルパスを格納するリスト
        file_paths = self.parse_drop_files(event.data)
        if file_paths:
            self.load_images(file_paths)
        else:
            messagebox.showerror("エラー", "ファイルの読み込みに失敗しました。")

    def parse_drop_files(self, data):
        # ファイルパスの解析
        import re
        # 先頭と末尾の空白を削除
        data = data.strip()
        # 正規表現でファイルパスを抽出
        pattern = r'{(.*?)}|"(.*?)"|\'(.*?)\'|(\S+)'
        matches = re.findall(pattern, data)
        file_paths = []
        for match in matches:
            path = next(filter(None, match))
            # パスのエンコードを修正(必要に応じて)
            if path.startswith('file://'):
                path = path[7:]
            path = path.replace('\\', '/')
            file_paths.append(path)
        return file_paths

    def load_images(self, file_paths):
        print("Loading images:", file_paths)
        try:
            # カスタムダイアログで一括入力
            params = self.get_image_params()
            if params is None:
                return  # キャンセルされた場合
            width, height, channels, bit_depth = params

            # パラメータを保存
            self.save_last_params(params)

            # データ型を決定
            if bit_depth == 8:
                dtype = np.uint8
            elif bit_depth == 16:
                dtype = np.uint16
            else:
                messagebox.showerror("エラー", "サポートされていないビット深度です。")
                return

            images = []
            for file_path in file_paths:
                # ファイルからバイナリデータを読み込む
                with open(file_path, 'rb') as f:
                    raw_data = f.read()

                # 期待されるデータサイズを計算
                expected_size = width * height * channels * (bit_depth // 8)
                if len(raw_data) < expected_size:
                    messagebox.showerror("エラー", f"ファイルサイズが不足しています。\nファイル: {os.path.basename(file_path)}")
                    return
                elif len(raw_data) > expected_size:
                    messagebox.showwarning("警告", f"ファイルサイズが大きすぎます。余分なデータは無視されます。\nファイル: {os.path.basename(file_path)}")
                    raw_data = raw_data[:expected_size]

                # バイナリデータをNumPy配列に変換
                image = np.frombuffer(raw_data, dtype=dtype)
                image = image.reshape((height, width, channels))

                # 16ビットの場合は8ビットにスケーリング
                if bit_depth == 16:
                    image = (image / 256).astype('uint8')

                # PILイメージに変換
                if channels == 1:
                    image = image.reshape((height, width))
                    pil_image = Image.fromarray(image, mode='L')
                elif channels == 3:
                    pil_image = Image.fromarray(image, mode='RGB')
                else:
                    messagebox.showerror("エラー", f"サポートされていないチャンネル数です。\nファイル: {os.path.basename(file_path)}")
                    return

                images.append(np.array(pil_image, dtype=np.float32))  # float32で積算可能

            # 画像の平均化
            averaged_image = np.mean(images, axis=0).astype('uint8')
            self.image = Image.fromarray(averaged_image, mode='L') if channels == 1 else Image.fromarray(averaged_image, mode='RGB')

            # ズームレベルとオフセットのリセット
            self.zoom_level = 1.0
            self.offset_x = 0
            self.offset_y = 0

            # キャンバスをクリアして画像を配置
            self.update_image()

        except Exception as e:
            messagebox.showerror("エラー", f"画像の読み込みに失敗しました。\n{e}")

    def get_image_params(self):
        dialog = ImageParamsDialog(self, self.last_params)
        self.wait_window(dialog.top)
        return dialog.result

    def save_last_params(self, params):
        with open('last_params.json', 'w') as f:
            json.dump(params, f)

    def load_last_params(self):
        if os.path.exists('last_params.json'):
            with open('last_params.json', 'r') as f:
                params = json.load(f)
                return params
        else:
            return None

    def update_image(self):
        if self.image is None:
            return

        # ズームの適用
        width, height = self.image.size
        resized_image = self.image.resize((int(width * self.zoom_level), int(height * self.zoom_level)), Image.NEAREST)

        # PILイメージをTkinterで表示可能な形式に変換
        self.photo_image = ImageTk.PhotoImage(resized_image)

        # キャンバスをクリアして画像を再配置
        self.canvas.delete("all")
        self.image_on_canvas = self.canvas.create_image(self.offset_x, self.offset_y, anchor=tk.NW, image=self.photo_image)
        self.canvas.config(scrollregion=self.canvas.bbox(tk.ALL))

    def zoom_in(self):
        self.zoom_level *= 1.2
        self.update_image()

    def zoom_out(self):
        self.zoom_level /= 1.2
        self.update_image()

    def zoom(self, event):
        if self.image is None:
            return
        if event.delta > 0 or event.num == 4:
            self.zoom_in()
        elif event.delta < 0 or event.num == 5:
            self.zoom_out()

    def start_pan(self, event):
        if self.image is None:
            return
        self.canvas.scan_mark(event.x, event.y)

    def do_pan(self, event):
        if self.image is None:
            return
        self.canvas.scan_dragto(event.x, event.y, gain=1)
        self.offset_x = self.canvas.canvasx(0)
        self.offset_y = self.canvas.canvasy(0)

    def end_pan(self, event):
        if self.image is None:
            return
        self.offset_x = self.canvas.canvasx(0)
        self.offset_y = self.canvas.canvasy(0)

    def show_pixel_value(self, event):
        if self.image is None:
            self.statusbar.config(text="画像を開いてください")
            return

        # キャンバス上の座標を画像上の座標に変換
        canvas_coords = self.canvas.canvasx(event.x), self.canvas.canvasy(event.y)
        x = int((canvas_coords[0] - self.offset_x) / self.zoom_level)
        y = int((canvas_coords[1] - self.offset_y) / self.zoom_level)
        if 0 <= x < self.image.width and 0 <= y < self.image.height:
            pixel = self.image.getpixel((x, y))
            self.statusbar.config(text=f"座標: ({x}, {y}) ピクセル値: {pixel}")
        else:
            self.statusbar.config(text="画像外です")

    def start_rect(self, event):
        if self.image is None:
            return
        self.rect_start_x = self.canvas.canvasx(event.x)
        self.rect_start_y = self.canvas.canvasy(event.y)
        self.rect = self.canvas.create_rectangle(self.rect_start_x, self.rect_start_y, self.rect_start_x, self.rect_start_y, outline='red')

    def draw_rect(self, event):
        if self.rect is None:
            return
        self.rect_end_x = self.canvas.canvasx(event.x)
        self.rect_end_y = self.canvas.canvasy(event.y)
        self.canvas.coords(self.rect, self.rect_start_x, self.rect_start_y, self.rect_end_x, self.rect_end_y)

    def end_rect(self, event):
        if self.rect is None:
            return
        # 選択範囲の取得
        x0 = int((min(self.rect_start_x, self.rect_end_x) - self.offset_x) / self.zoom_level)
        y0 = int((min(self.rect_start_y, self.rect_end_y) - self.offset_y) / self.zoom_level)
        x1 = int((max(self.rect_start_x, self.rect_end_x) - self.offset_x) / self.zoom_level)
        y1 = int((max(self.rect_start_y, self.rect_end_y) - self.offset_y) / self.zoom_level)

        # 画像の領域を取得
        region = self.image.crop((x0, y0, x1, y1))
        # NumPy配列に変換
        region_data = np.array(region)
        # 平均値とノイズ(標準偏差)を計算
        mean_value = np.mean(region_data)
        noise_value = np.std(region_data)
        messagebox.showinfo("計算結果", f"平均画素値: {mean_value:.2f}\nノイズ値(標準偏差): {noise_value:.2f}")

        # プロファイルのプロット
        self.plot_profile(region_data)

        # 矩形を削除
        self.canvas.delete(self.rect)
        self.rect = None

    def plot_profile(self, data):
        # 日本語フォントの設定
        from matplotlib import font_manager

        # フォントのパスを指定(Windowsの場合)
        font_path = 'C:/Windows/Fonts/msgothic.ttc'  # MSゴシックフォント

        # フォントが存在するか確認
        if not os.path.exists(font_path):
            messagebox.showerror("エラー", f"日本語フォントが見つかりません。\n{font_path} を確認してください。")
            return

        font_prop = font_manager.FontProperties(fname=font_path)
        plt.rcParams['font.family'] = font_prop.get_name()

        # 横方向の平均
        hor_profile = np.mean(data, axis=0)
        # 縦方向の平均
        ver_profile = np.mean(data, axis=1)
        # プロット
        plt.figure(figsize=(10, 5))
        plt.subplot(2,1,1)
        plt.plot(hor_profile, color='blue')
        plt.title('横方向の平均画素値', fontproperties=font_prop)
        plt.xlabel('ピクセル位置', fontproperties=font_prop)
        plt.ylabel('平均画素値', fontproperties=font_prop)
        plt.subplot(2,1,2)
        plt.plot(ver_profile, color='green')
        plt.title('縦方向の平均画素値', fontproperties=font_prop)
        plt.xlabel('ピクセル位置', fontproperties=font_prop)
        plt.ylabel('平均画素値', fontproperties=font_prop)
        plt.tight_layout()
        plt.show()

class ImageParamsDialog:
    def __init__(self, parent, last_params=None):
        self.result = None
        self.top = tk.Toplevel(parent)
        self.top.title("画像パラメータの入力")
        self.top.grab_set()

        tk.Label(self.top, text="画像の幅(ピクセル):").grid(row=0, column=0, padx=10, pady=5, sticky='e')
        tk.Label(self.top, text="画像の高さ(ピクセル):").grid(row=1, column=0, padx=10, pady=5, sticky='e')
        tk.Label(self.top, text="チャンネル数(1:グレースケール, 3:RGB):").grid(row=2, column=0, padx=10, pady=5, sticky='e')
        tk.Label(self.top, text="ビット深度(8または16):").grid(row=3, column=0, padx=10, pady=5, sticky='e')

        self.width_entry = tk.Entry(self.top)
        self.height_entry = tk.Entry(self.top)
        self.channels_entry = tk.Entry(self.top)
        self.bit_depth_entry = tk.Entry(self.top)

        self.width_entry.grid(row=0, column=1, padx=10, pady=5)
        self.height_entry.grid(row=1, column=1, padx=10, pady=5)
        self.channels_entry.grid(row=2, column=1, padx=10, pady=5)
        self.bit_depth_entry.grid(row=3, column=1, padx=10, pady=5)

        # 前回の入力をデフォルト値として設定
        if last_params:
            self.width_entry.insert(0, str(last_params[0]))
            self.height_entry.insert(0, str(last_params[1]))
            self.channels_entry.insert(0, str(last_params[2]))
            self.bit_depth_entry.insert(0, str(last_params[3]))

        self.ok_button = tk.Button(self.top, text="OK", command=self.ok)
        self.ok_button.grid(row=4, column=0, padx=10, pady=10)
        self.cancel_button = tk.Button(self.top, text="キャンセル", command=self.cancel)
        self.cancel_button.grid(row=4, column=1, padx=10, pady=10)

        self.width_entry.focus_set()
        self.top.protocol("WM_DELETE_WINDOW", self.cancel)

    def ok(self):
        try:
            width = int(self.width_entry.get())
            height = int(self.height_entry.get())
            channels = int(self.channels_entry.get())
            bit_depth = int(self.bit_depth_entry.get())
            if width <= 0 or height <= 0:
                raise ValueError
            if channels not in (1, 3):
                raise ValueError
            if bit_depth not in (8, 16):
                raise ValueError
            self.result = [width, height, channels, bit_depth]
            self.top.destroy()
        except ValueError:
            messagebox.showerror("入力エラー", "正しい数値を入力してください。")

    def cancel(self):
        self.result = None
        self.top.destroy()

if __name__ == "__main__":
    app = RawImageViewer()
    app.mainloop()
アプリの使い方
1. プログラムの実行
上記のコードを raw_image_viewer.py として保存し、Python 3 環境で実行します。
python raw_image_viewer.py
2. 画像の読み込み
- ドラッグ&ドロップで読み込む場合:
- RAW画像ファイルをキャンバス上にドラッグ&ドロップします。
- 画像パラメータ入力ダイアログが表示されるので、以下の情報を入力します。
- 画像の幅(ピクセル)
- 画像の高さ(ピクセル)
- チャンネル数(1または3)
- ビット深度(8または16)
- ファイルダイアログから読み込む場合:
- メニューバーの「ファイル」から「開く (Ctrl+O)」を選択します。
- 複数のRAW画像ファイルを選択します。
3. 画像の操作
- 拡大縮小: マウスホイールや「拡大 (+)」「縮小 (-)」ボタンで画像を拡大・縮小できます。
- 画像の移動(パン): マウス左ボタンを押しながらドラッグして画像を移動できます。
- ピクセル値の確認: マウスカーソルを画像上に移動すると、ステータスバーに座標とピクセル値が表示されます。
- 範囲選択と解析:
- マウス右ボタンを押しながらドラッグして範囲を選択します。
- 選択範囲を終了すると、その領域の平均画素値とノイズ値(標準偏差)が表示されます。
- また、選択範囲の縦方向・横方向の平均画素値がグラフとして表示されます。
注意点
- ファイル形式: このプログラムはヘッダー情報を持たない純粋なバイナリデータの
.rawファイルに対応しています。カメラメーカー固有のRAW形式(例:CR2、NEF、ARWなど)には対応していません。 - 画像パラメータ: 画像の幅、高さ、チャンネル数、ビット深度が正確でない場合、画像が正しく表示されません。正確な値を入力してください。
- 日本語フォントの設定:
- グラフのタイトルやラベルが正しく表示されない場合、日本語フォントが指定されたパスに存在しない可能性があります。
- お使いの環境に合わせて、
plot_profileメソッド内のfont_pathを適切な日本語フォントのパスに変更してください。- Windowsの場合:
font_path = 'C:/Windows/Fonts/msgothic.ttc'(MSゴシック)- または
font_path = 'C:/Windows/Fonts/meiryo.ttc'(メイリオ)
- Macの場合:
font_path = '/System/Library/Fonts/ヒラギノ角ゴシック W3.ttc'
- Linuxの場合:
- インストールされている日本語フォントのパスを指定してください。
- Windowsの場合:
- 免責事項
本アプリケーションのご利用によって生じたいかなる損害や不利益に対して、当方は一切の責任を負いかねます。ご利用は自己責任でお願いいたします。本アプリケーションを使用する際は、事前にデータのバックアップを取るなど、十分な注意と対策を行ってください。また、本アプリケーションの動作や結果について保証するものではありません。
まとめ
この汎用RAW画像ビューア&評価アプリは、簡単な操作でRAW画像の閲覧と解析が行える便利なツールです。特に、複数の画像を平均化してノイズを低減したり、特定の領域の画素値を詳細に調べたりするのに役立ちます。
ぜひこのアプリを活用して、RAW画像の解析・評価にお役立てください。
コメント